Yoga For Remote Office Workers: 12 Stretches to Relieve Back Pain
There are numerous upsides to working from home and one of the most attractive reasons is scheduling flexibility. Considering that most Americans spend 48 minutes a day commuting, working from home frees up an average of four hours a week, empowering remote employees to spend more time stretching and less time sitting in traffic.
The harmful effects of sedentary lifestyles are well-documented and medical experts urge people to incorporate regular exercise into their days. In fact, excessive sitting has been cautioned against for years and Dr. James Levine, director of the Mayo Clinic-Arizona State University Obesity Solutions Initiative, summed up the harmful effects of desk-bound work in one sentence: “Sitting is more dangerous than smoking, kills more people than HIV, and is more treacherous than parachuting.”
What’s more, sitting in one position for too long causes back pain for many people. While having good ergonomics and posture can help to ease discomfort from desk work, yoga is recommended by many health and wellness experts to stretch and strengthen the body and relieve back pain.
So what is yoga? Simply put, yoga is an ancient physical, mental, and spiritual practice from India that links breath, movement, and mindfulness. Over the past 40 years, yoga has exploded in popularity worldwide and research from Yoga Alliance and Yoga Journal in 2016 says more than 36 million people in the United States have participated in a yoga class at some point in their lives—an 85 percent increase from 20 million people in 2012.
The most popular place to practice yoga is at home and the top two reasons cited as motivation to start and continue practicing yoga are flexibility and stress relief and reduction. With working-from-home opportunities on the rise in response to the COVID-19 pandemic, remote employees can trade their car keys for a yoga mat and more easily incorporate stretching breaks into their workdays.
And while people first come to yoga for a variety of reasons, the results speak for themselves: yoga is an effective practice to manage chronic pain, increase strength and flexibility, promote inner calm, and reduce anxiety all of which can lead to enhanced productivity.
How can yoga help office workers? While there is no one size fits all solution when it comes to pain management, a study published by the National Institutes of Health in 2017 shows that regular and consistent yoga practice can ease moderate to severe chronic lower back pain. As a general rule, people with chronic or sensitive health conditions are advised to consult their medical professionals before beginning any new physical practices or fitness routines. Pregnant women are advised to seek specialized prenatal yoga classes and special cues are mentioned here.
And to learn the postures safely, it is advised to practice yoga under the guidance of a teacher in-person, through a face-to-face or online class, or with the help of instructional materials like this one written by an experienced yoga teacher.
Here are twelve yoga postures to practice at home for office workers with back pain. It is recommended to hold each posture for three to five breaths (one breath equals one inhale and exhale cycle), modify movements as needed, and to use props, blankets or pillows to promote relaxation to ease any pain or discomfort.
These postures can be done individually or practiced in the order they are listed below. To honor the cultural roots of yoga and reflect the terminology used by teachers, the yoga posture names are provided in English and Sanskrit.
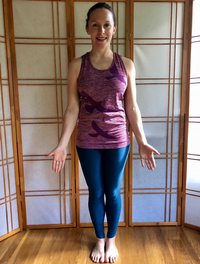
Mountain Pose – Tadasana
Steps:
- 1. Inhale, stand with feet together big toes touching (or step the feet hip-width apart if feet together causes pain). Spread the toes, firm the feet and leg muscles, bend the knees slightly, draw the abdominal muscles in and up.
- 2. Exhale, tuck the tailbone down, draw the low ribs in, straighten the spine, broaden the shoulders away from the ears, take the hands open and down by the sides. Chin is level with the floor.
- 3. Hold this posture for three to five breaths.
Benefits: Lengthens and strengthens the spine, legs, and feet, can relieve sciatica pain.
Caution: Those with low blood pressure should practice with a hand on a wall or the back of a chair for balance.
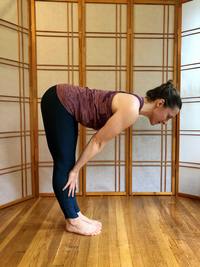
Half Standing Forward Bend – Ardha Uttanasana
Steps:
- 1. From tadasana: inhale, lengthen the spine.
- 2. Exhale, fold forward halfway, place hands on thighs, shins, or mat. Firm the feet, legs, and draw the abdominal and pelvic muscles up and in to protect the lower back. (Modification: If this is uncomfortable for the lower back, go to a wall and press hands to the wall instead of the legs, hands shoulder-width apart.)
- 3. Hold this posture for three to five breaths.
Benefits: Lengthens and strengthens the muscles of the abdomen, back, legs, and feet.
Caution: Those with neck injuries should keep the neck neutral and look down instead of forward.
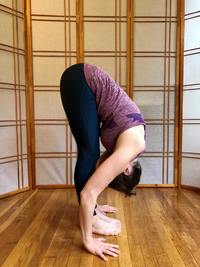
Standing Forward Bend – Uttanasana
Steps:
- 1. From ardha uttanasana: inhale, lengthen the spine, draw the abdominal muscles up and in.
- 2. Exhale, fold forward, keep the abdominal muscles lifted up and in, the crown of the head drops down towards the floor. Press the fingertips or palms to the outsides of the calves, shins, feet, or floor. (Modification: Bend the knees if straight legs are too intense for the hamstrings or lower back.)
- 3. Hold this posture for three to five breaths.
Benefits: Lengthens the muscles of the lower back, hamstrings, calves, and hips, strengthens the thighs, feet, and hips, calms the mind, relieves neck tension, and calms the mind.
Caution: Those with back or neck injuries should fold as far as possible without discomfort. Keep the back of the neck long and neutral; look down instead of forward. Pregnant women are advised to avoid this posture (and most forward folds), or proceed carefully if they have a previously established yoga practice.
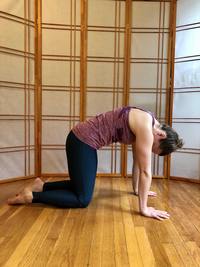
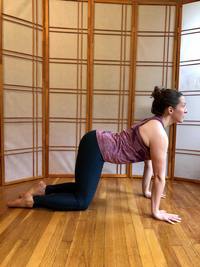
Cow – Bitilasana / Cat – Marjariasana
Steps:
- 1. From uttanasana: inhale lengthen the spine and come down to hands and knees on a yoga mat, blanket, or carpet. If more padding is needed, place a folded blanket under the knees or roll the yoga mat up under the heels of the hands to reduce flexion of the wrists.
- 2.Cow: Find a “tabletop” position with the hands shoulder-width apart, wrists under the shoulders, knees hip-width apart, spine is neutral, eyes looking down. From here, inhale to cow: arch the back, drop the belly, lift the sitting bones up, lift the chest forward, and look forward or up.
- 3. Cat: From cow, exhale and draw the spine back to neutral, then continue rounding the back up toward the ceiling for cat pose. Draw the abdominal muscles up toward the spine and the sky. Aim the crown of the head to the floor.
- 4. Repeat cow/cat poses three to five times—inhaling to arch the spine for cow, and exhaling to round the spine for cat.
Benefits: Lengthens and stretches the muscles of the back, torso, and neck; gently massages spine and internal organs.
Caution: Those with back or neck injuries should keep the back of the neck long and neutral.
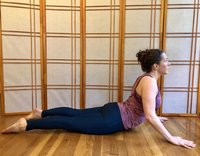
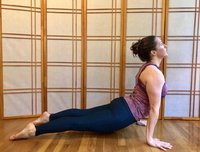
Cobra – Bhujangasana / Upward-Facing Dog – Urdhva Mukha Svanasana
Steps:
- 1. From tabletop: exhale, lower down to the belly by pressing into the hands; engage the abdominal and pelvic muscles to protect the back. Stretch the legs out behind, press the tops of the feet firmly on the floor hip-width apart.
- 2. Cobra (easier): Inhale, press the palms to the floor under the fronts of the shoulders, engage abdominal and pelvic floor muscles, and press the pubic bone into the mat. Straighten the arms as much as possible without discomfort in back, neck, or shoulders. Draw the shoulder blades together, lift the chest up (but not forward), and the belly lifts. Thighs stay on the mat. Breathe here for three to five breaths.
- 3. Upward-facing dog (more intense): From the face-down belly position, bend the elbows and press the palms firmly on the floor either side of the waist. Inhale, straighten the arms, lift the chest up and forward, arch the back, lift the thighs off the mat, belly lifts up and in, and bring the chest forward. Look to the nose or to the front.
- 4. Hold upward-facing dog for three to five breaths.
Benefits: This is an all-purpose posture to strengthen and lengthen the frontside of the body. Strengthens and lengthens the muscles of the feet, thighs, spine, hip flexors, chest, and abdomen. It also opens the heart and lungs. Cobra and upward-facing dog are often part of a sun salutation (suryanamaskar) sequence at the beginning of a yoga class to warm and awaken the body.
Caution: Beginners are recommended to first try cobra, then upward-facing dog. Take care to not strain the wrists or back and avoid this and other lying-on-the-belly postures if pregnant.
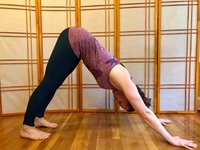
Downward-Facing Dog – Adho Mukha Svanasana
Steps:
- 1. From cobra or upward-dog: Inhale, curl the toes under, bend the knees.
- 2. Exhale, lift the knees away from the floor, lift and lengthen the sitting bones high to the sky.
- 3. Straighten the legs and ground the heels toward the floor, bending the knees if necessary. Tops of the thighs lift, tailbone lengthens and tucks forward slightly. Draw the abdominal and pelvic floor muscles in and up. Press all four corners of the hands and feet firmly into the mat. Ears line up with the upper arms. Look at the nose or towards the navel without straining the neck.
- 4. Hold downward-facing dog for three to five breaths.
Benefits: This is an all-purpose posture to strengthen and lengthen the backside of the body: the spine, arms, legs, hamstrings, calves, hands, and feet. It calms the mind, resets the spine, and relieves neck, shoulder, and back discomfort. Downward-facing dog is often part of a sun salutation sequence and a complementary posture to upward-facing dog.
Cautions: If wrist flexion is painful, fold the top of the mat over and place heels of the hands on the folded mat. If wrists cannot support any weight, come down to the knees, hips up, and arms spread straight out on the ground with the palms down for puppy pose. Alternatively, press the forearms into the ground, bend the elbows, and straighten the legs behind for a forearm plank or walk the feet in and hips up for dolphin pose. Avoid downward-facing dog in late-term pregnancy.
Locust Pose – Shalabasana
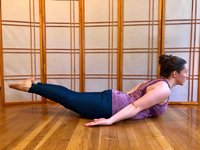
Steps:
- 1. From downward-facing dog: Inhale, lower the hips to a straight line, bring the head forward, and come into a plank position with the arms and legs straight. Exhale, lower the body down in one line, lowering the knees first if necessary.
- 2. Press the tops of the feet on the mat, place the hands either side of the hips and press the backs of the hands on the mat, palms facing up.
- 3. Inhale, lift the head, chest, upper torso, and legs off the mat. Extend the back of the neck long, keep the big toes together and point the toes if it doesn’t hurt the back. Draw everything into the midline of the body from head to toe. Look forward or on the nose.
- 4. Hold shalabasana for three to five breaths.
Benefits: An accessible backbend that prepares the back, legs, and shoulders for deeper backbends, strengthens the muscles of the lower back, torso, legs, and arms.
Cautions: Those with neck or shoulder injuries can lift the chest slightly or keep the chest on the floor and keep the back of the neck long. If back pain is present, take the feet apart and press the tops of the feet into the floor or take cobra pose. Avoid this and other lying-on-the-belly postures if pregnant.
Seated Forward Bend – Paschimottanasana
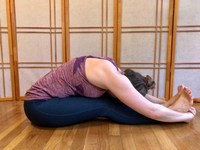
Steps:
- 1. From shalabasana: Exhale and release the forehead and tops of the feet to the floor. Inhale, place hands under shoulders, and exhale, press up and back into downward-facing dog. From downward-facing dog: Come through to a seated position with legs together stretched out in front, feet together, activate the legs, and flex the feet.
- 2. Inhale, reach forward, and take the hands outside the legs or on the mat, to tops of the thighs, knees, shins, ankles, or the sides of the feet, engage abdominal and pelvic floor muscles.
- 3. Exhale, fold forward, bending the knees if necessary, keep the back of the neck long.
- 4. Hold this posture for three to five breaths.
Benefits: An essential complementary stretch after a backbend; stretches the spine, shoulders, and hamstrings. Calms the mind.
Cautions: Those with tight hamstrings are advised to sit on a folded blanket, roll a blanket under the knees for support, or hold on to a strap looped around the bottoms of the feet.
Head-to-Knee Forward Bend – Janu Sirsasana A
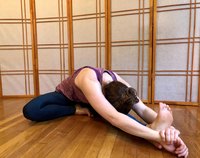
Steps:
- 1. From paschimottanasana: Inhale, sit up tall, exhale, and release the hands to the side. Inhale, bend the right knee and press the sole of the right foot as high as possible into the inseam of the left thigh.
- 2. Inhale, engage abdominal and pelvic floor muscles, and take the hands to the outside of the left leg (the tops of the thighs, knees, shins, ankles, or the sides of the feet); exhale and fold the center of the chest over the left leg. Keep the back of the neck long. Hold for three to five breaths.
- 3. Inhale, sit tall, exhale, release the hands, and repeat on the other side.
Benefits: Stretches the hamstrings, and muscles of the shoulders, spine, and sides of the body. Releases tension in the lower back. Calms the mind.
Cautions: For those with tight outer or inner thighs, place a folded blanket under the bent knee to promote relaxation. For those with tight hamstrings, use a strap and bend the knee of the straight leg to fold forward gradually if tightness is present.
Happy Baby – Ananda Balasana
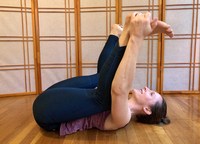
Steps:
- 1. From Janu Sirsasana A: Inhale, stretch the legs out in front, exhale, lie down on the back, take the feet up in the air.
- 2. Inhale, bend the knees to chest, and spread the legs as wide as is comfortable.
- 3. Grab the sides of flexed feet with the hands. Draw the knees towards the armpits.
- 4. Position the ankles right above the knees. Push up with the feet and pull down with the hands. Find a comfortable push/pull resistance equilibrium with the hands and feet.
- 5. Take a few rocks on the spine side to side. Inhale when the feet come up in the air, and exhale when they go down to one side. Invite a sense of playfulness and relaxation to this rocking movement.
- 6. Hold happy baby or roll side to side for three to five or more breaths.
Benefits: Stretches the hamstrings, opens the hips, increases knee, foot, ankle, and wrist mobility, eases back and shoulder tension and discomfort, calms the mind, relieves stress and fatigue.
Cautions: Those with knee and ankle injuries, bend the joints carefully. Those with neck or spinal injuries, support the spine or neck with an extra blanket. If clasping the feet isn’t possible, use a strap or keep the legs up in the air, bend the knees slightly and roll side to side, arms on either side of the torso, palms down on either side of the body for stability. Alternatively, plant both feet hip-width apart on the floor and allow the knees to fall together inward in constructive rest or keep the knees together and pelvis on the floor, move the knees side to side in a windshield wiper action.
To fully enjoy the benefits of yoga, set aside consistent time to practice every day or as often as possible.